Cohort Tree Manager
User Manual — All Roles
Plugin: local_cohorttree ·
Version: 2.2.127 ·
Moodle 4.5+ ·
Maincon AB ·
2026
1 Overview & Key Concepts
Cohort Tree Manager is a Moodle local plugin that lets organisations
model their structure as a tree of nodes — such as companies, departments, and teams —
and link those nodes to Moodle cohorts. From that tree you can manage cohort membership,
bulk-enrol cohorts to courses, and view detailed completion reports, all in one place.
What's new in v2.2.133
This summary covers user-facing changes since v2.2.126.
Configurable role capability matrix
Site administrators can now configure exactly which actions each node role type (Reporter, Enroller, Manager) is allowed to perform. Go to
Site Administration → Plugins → Cohort Tree Manager → Node role capability matrix.
Every action in the plugin — including creating and editing nodes, deleting nodes, assigning node managers, and accessing the Virtual Cohorts page — can be delegated to any role. Default settings keep all previously admin-only actions restricted to site administrators.
Node Managers can manage cohort and direct members
Node Managers can now add and remove cohort members and direct node members within their assigned subtree. When adding members to a node (including newly created child nodes), candidates are drawn from the entire assigned subtree — not just the specific node — so members are always available to choose from.
Node Managers are scoped to their assigned subtree
When a Node Manager creates or edits a node, the parent node dropdown now shows only nodes within their assigned subtree. They cannot create root-level nodes or nodes outside their assignment. The Auto-sync button is also no longer visible to Node Managers — it remains admin-only.
Remove virtual cohort button fixed
The Remove virtual cohort button on the Virtual Cohorts page now works correctly in all Moodle 4.x themes.
Screenshot · screenshots/screen-01-01.png
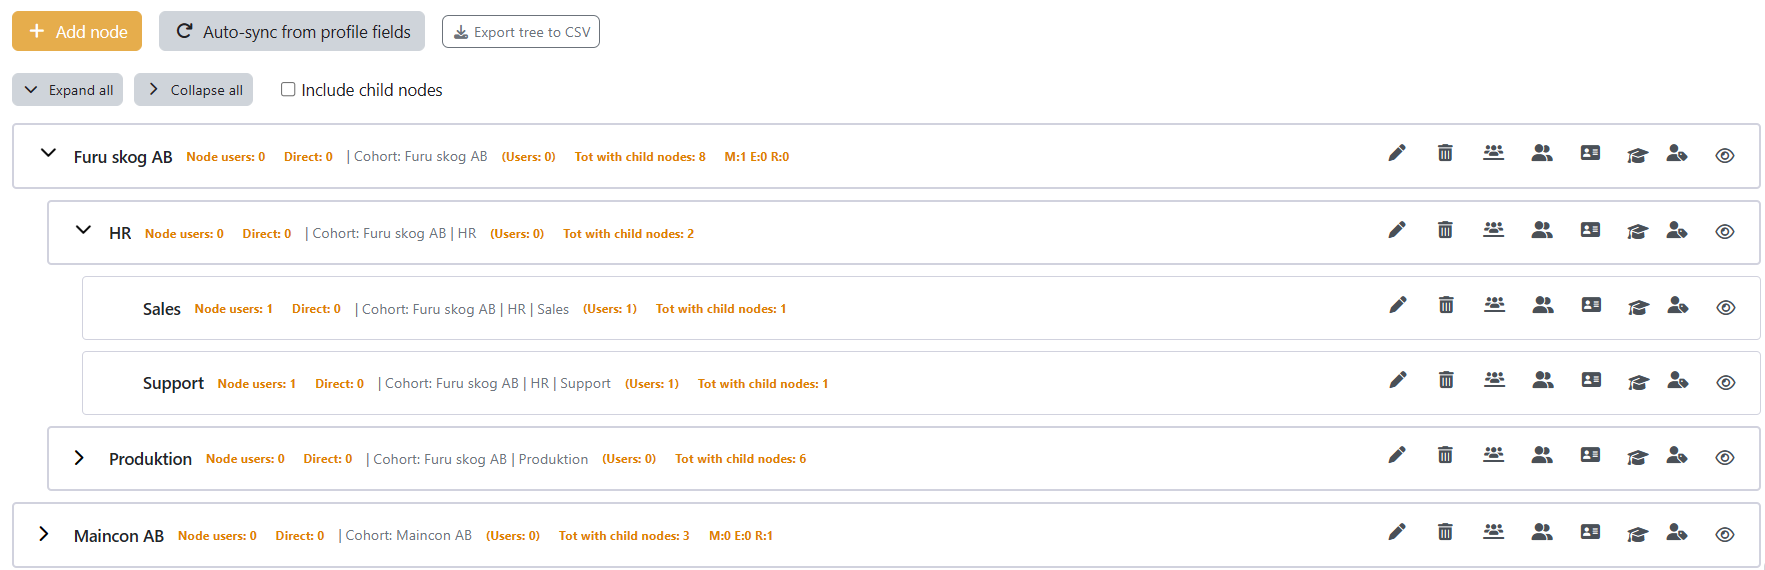
The Cohort Tree Manager main page (Tree view tab) showing a three-level organisation tree with expandable nodes, action icons, and member count badges on the right side of each node.
Key concepts
🌳
Node
A single unit in the organisational hierarchy — e.g. a company, a department, or a team.
Nodes can be nested to any depth. Each node may have a linked cohort and/or
direct members.
👥
Cohort
A standard Moodle cohort linked to a node. Members of the cohort are counted and
displayed in the tree. Cohort members can be enrolled in courses as a group.
📌
Direct member
A user explicitly added to a node — independent of any cohort. Useful for nodes
created manually (not auto-synced) or when a user belongs to a node but not its cohort.
If the node has no linked cohort a virtual cohort is created automatically to
enable course enrolments.
🔮
Virtual cohort
An automatically managed Moodle cohort created for nodes that have direct members but
no autosync cohort. Virtual cohorts are listed on the Virtual Cohorts tab
(site administrators only).
🔄
Auto-sync
Automatically builds and maintains the tree from Moodle user profile fields
(e.g. Institution → Department → City). When enabled, new users are placed in the
correct node based on their profile data without manual intervention.
Role overview
Access to the plugin is controlled by a combination of Moodle capabilities and
per-node role assignments. The five tiers covered in this manual are:
| Role tier |
Assigned by |
Typical user |
Main access |
| Student Regular user |
Standard Moodle enrolment |
Employee / learner |
Personal completion dashboard only |
| Reporter Node Reporter |
Node manager assignment |
Team leader (view only) |
Reports tab for assigned nodes |
| Enroller Node Enroller |
Node manager assignment |
HR / team lead |
Reports + manage members + enrol to courses |
| Manager Node Manager |
Node manager assignment |
Org admin / manager |
Full subtree management |
| Admin Site Admin |
Moodle site administration |
LMS administrator |
Everything, including plugin settings |
Note — Guests and unauthenticated users: The plugin is not accessible
to guests or unauthenticated users. Attempting to visit any plugin page redirects to
the Moodle login page.
Any authenticated Moodle user — including students, teachers, and editing teachers —
who has not been assigned a node role can access a personal reports view showing only
their own course completion data. No tree management is possible at this level.
2.1 Accessing personal reports
Navigate to Site Administration → Plugins → Local plugins → Cohort Tree Manager,
or follow a direct link provided by your administrator. The plugin detects that you have
no management role and takes you directly to the Reports page showing
your personal dashboard.
Screenshot · screenshots/screen-02-01.png
The Reports page as seen by a student: no Tree view or Manage courses tabs are visible in the navigation. Only the Reports tab is shown, open on the personal Dashboard sub-tab.
2.2 Personal dashboard
The dashboard displays summary statistics for your own course enrolments:
- Enrolled — total number of courses you are enrolled in.
- Completed — courses where you have met the completion criteria.
- In progress — courses you have started but not yet completed.
- Not started — courses you have not opened yet.
- A completion rate gauge showing your overall percentage as a colour-coded circle.
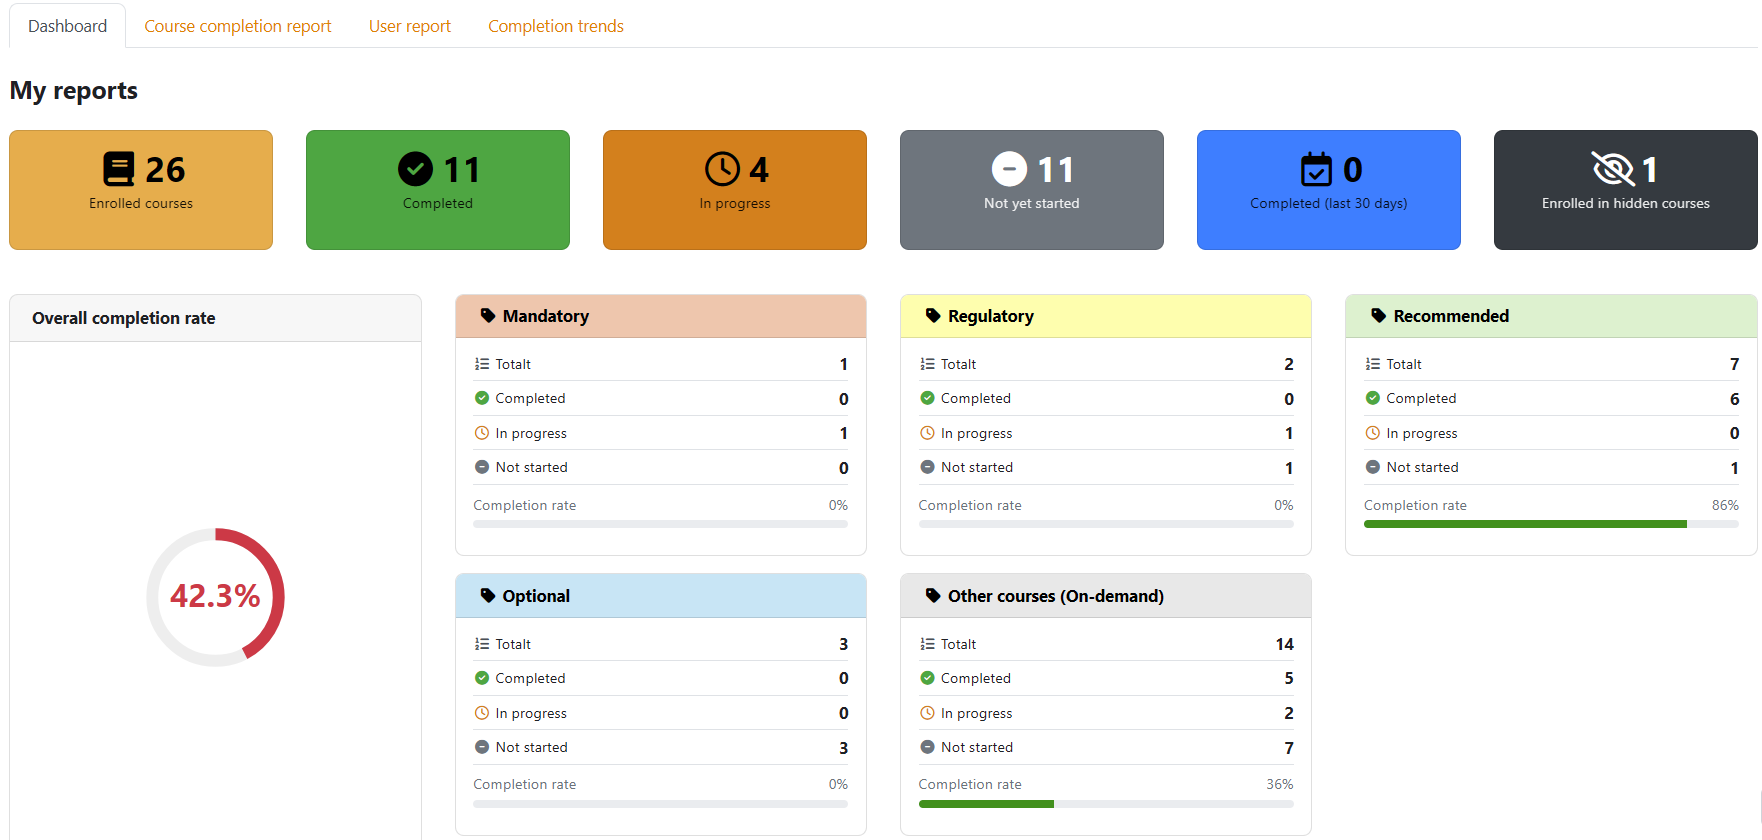
Screenshot · screenshots/screen-02-02.png

The personal dashboard showing four summary stat cards (Enrolled, Completed, In progress, Not started) and a circular completion rate gauge below them. Colours range from red (low) through yellow to green (high).
2.3 My course completion
Scroll below the dashboard summary to find a list of all your enrolled courses with
their individual completion status. Click a course name to go directly to the course.
Screenshot · screenshots/screen-02-03.png
A list of enrolled courses below the summary cards, each row showing the course name, a status pill (Completed / In progress / Not started), and a link to the course page.
Tip: If you cannot see the Reports page at all, ask your site
administrator to verify that the local/cohorttree:viewownreports
capability is granted to the authenticated user archetype.
A Node Reporter is assigned to one or more specific nodes by a site administrator.
Reporters can view all report tabs for their assigned nodes and their descendants,
and may export data if the site administrator grants the export capability.
They cannot modify the tree, manage cohorts, manage users, or enrol cohorts to courses.
When a Reporter visits the plugin, they are automatically directed to the
Reports page. The Tree view and Manage courses tabs are not shown.
3.1 Access and navigation
Reporters see a single Reports tab in the plugin
navigation. Below the page heading, five report sub-tabs are available:
- Dashboard
- Completion report
- User report
- Comparison report
- Trends
Screenshot · screenshots/screen-03-01.png

The Reports page navigation showing only the Reports top-level tab. Below the page heading the five sub-tab pills (Dashboard, Completion report, User report, Comparison report, Trends) are visible.
Note: Data shown is scoped to the nodes the Reporter has been assigned
to, plus all their descendant nodes. Nodes outside the assigned subtree are not visible.
3.2 Reports overview — Dashboard tab
The dashboard gives a quick statistical overview of the assigned subtree:
- Summary cards — Total users | Enrolled | Completed | In progress | Not started | Completed last 30 days | Enrolled in hidden courses.
- Completion rate gauge — colour-coded circle (green ≥ 75 %, yellow 50–74 %, red < 50 %).
- Per course-type breakdown — one card per configured course type (e.g. Mandatory, Optional) showing counts and a completion rate bar.
- Other courses — a card for courses not assigned to any type.
- Top performing cohorts — ranked list of cohorts with the highest completion rates.
- Recent completions — last 5 completions showing user, course, and date.
- Most enrolled / Most popular courses — top 5 course lists.
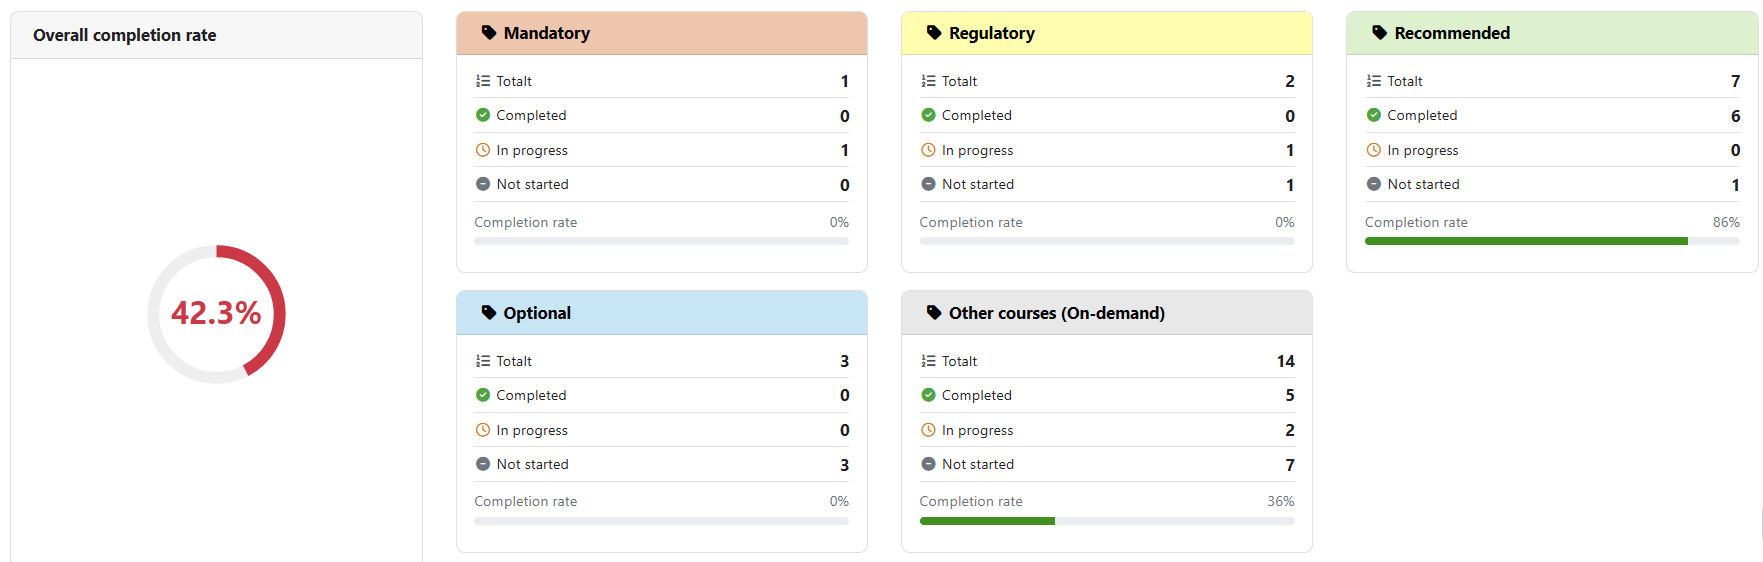
Screenshot · screenshots/screen-03-02.png

The Reports dashboard showing the seven summary stat cards across the top row, the circular gauge to the right, and course-type breakdown cards below. A "My reports" pill filter at the top lets the reporter switch between their personal view and the subtree view.
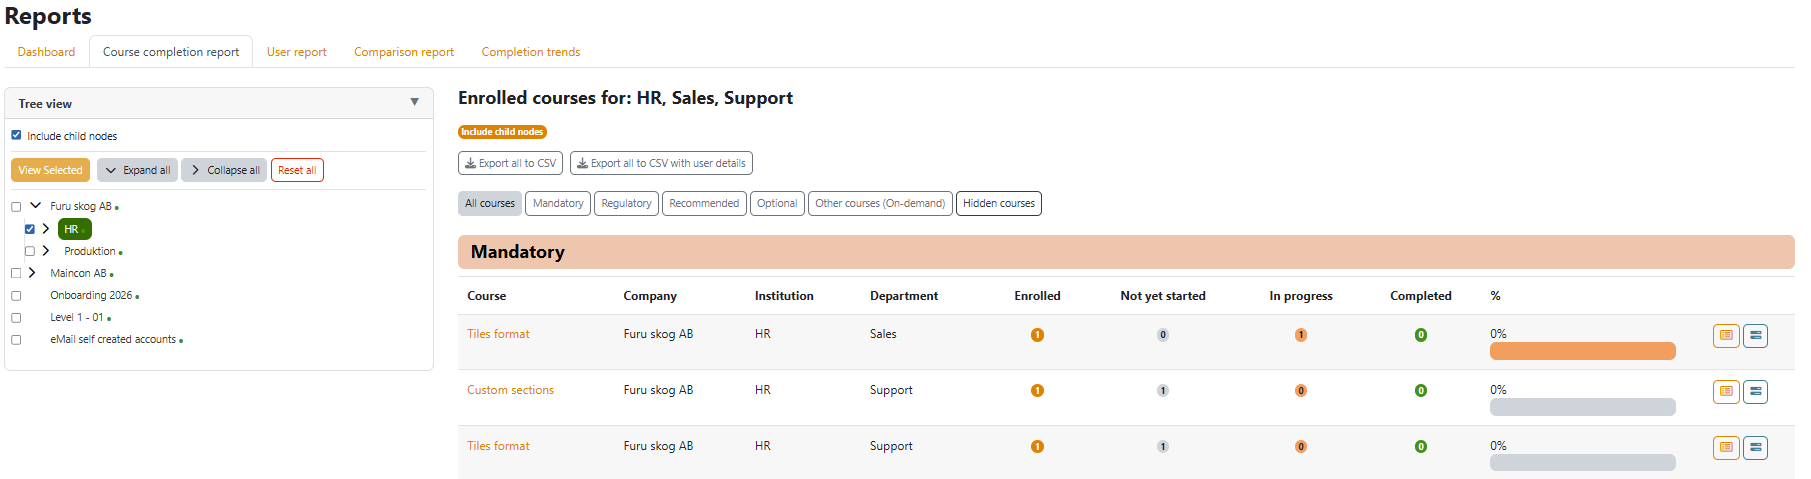
3.3 Completion report
The Completion report shows course completion aggregates per node.
Use the node selector (mini-tree on the left) to choose which node to view.
Check Include child nodes to aggregate data from all descendants.
Screenshot · screenshots/screen-03-03.png
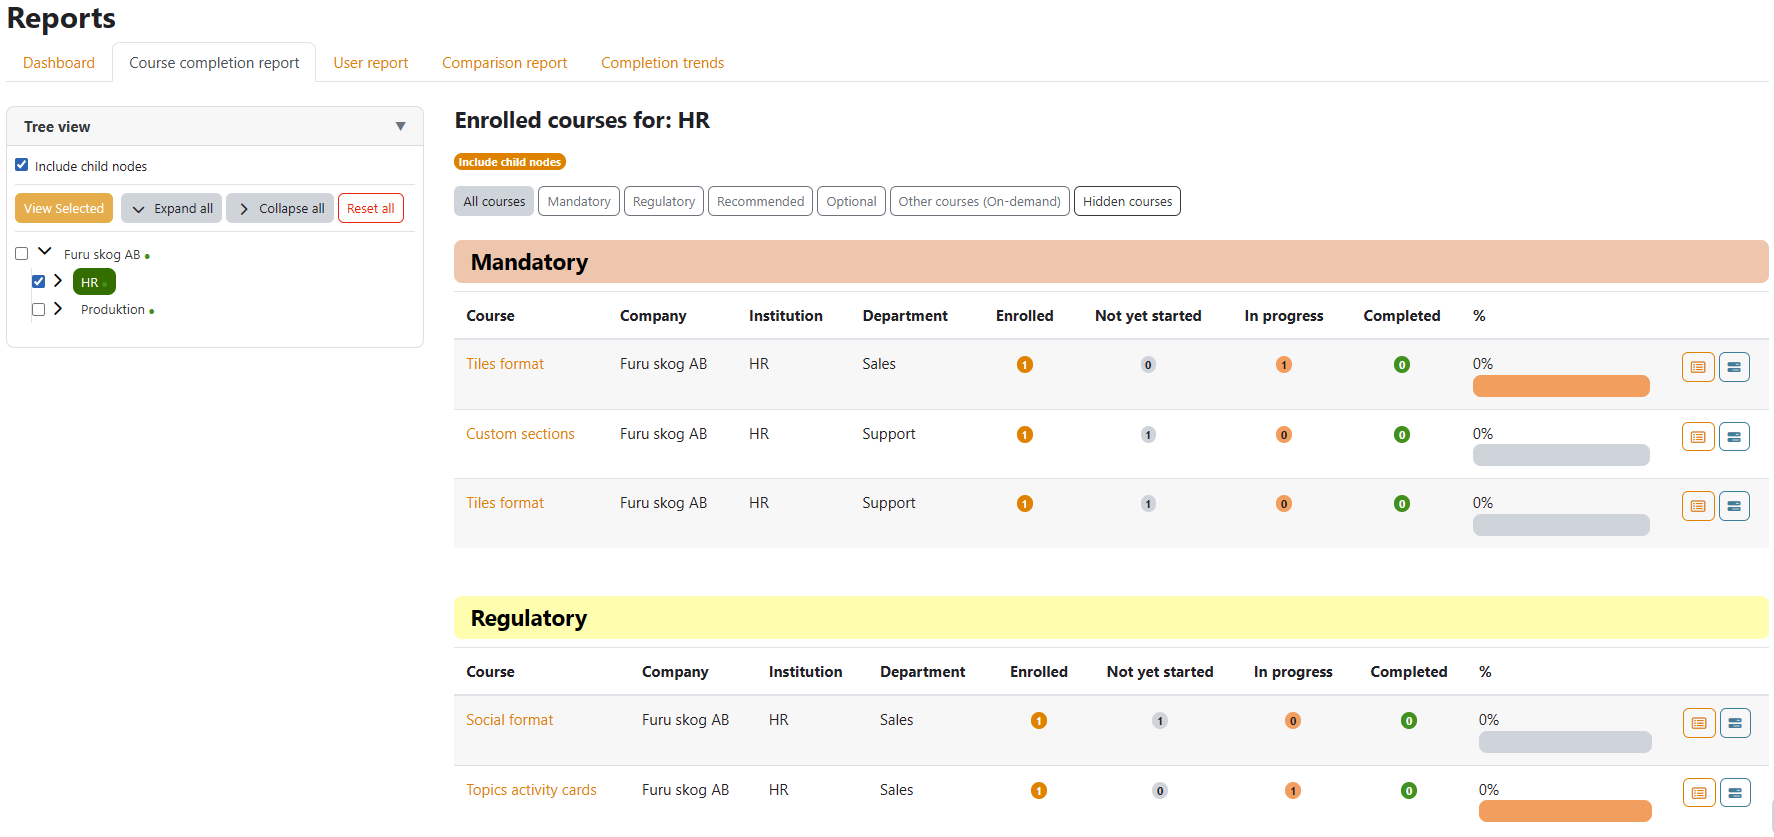
The Completion report page in two-column layout: the mini organisation tree on the left with one node highlighted, and the results table on the right showing columns Node | Course | Enrolled | Completed | In progress | Not started | Completion %.
The results table shows:
| Column | Description |
|---|
| Node | The name of the tree node. |
| Course | Course name, linked to the course page. |
| Enrolled | Number of cohort members enrolled in the course. |
| Completed | Users who have met completion criteria. |
| In progress | Users who have opened the course but not completed it. |
| Not started | Enrolled users who have never opened the course. |
| Completion % | Completed ÷ Enrolled, expressed as a percentage. |
3.4 User report
The User report shows per-user course completion status across the selected node's
enrolled courses.
Screenshot · screenshots/screen-03-04.png
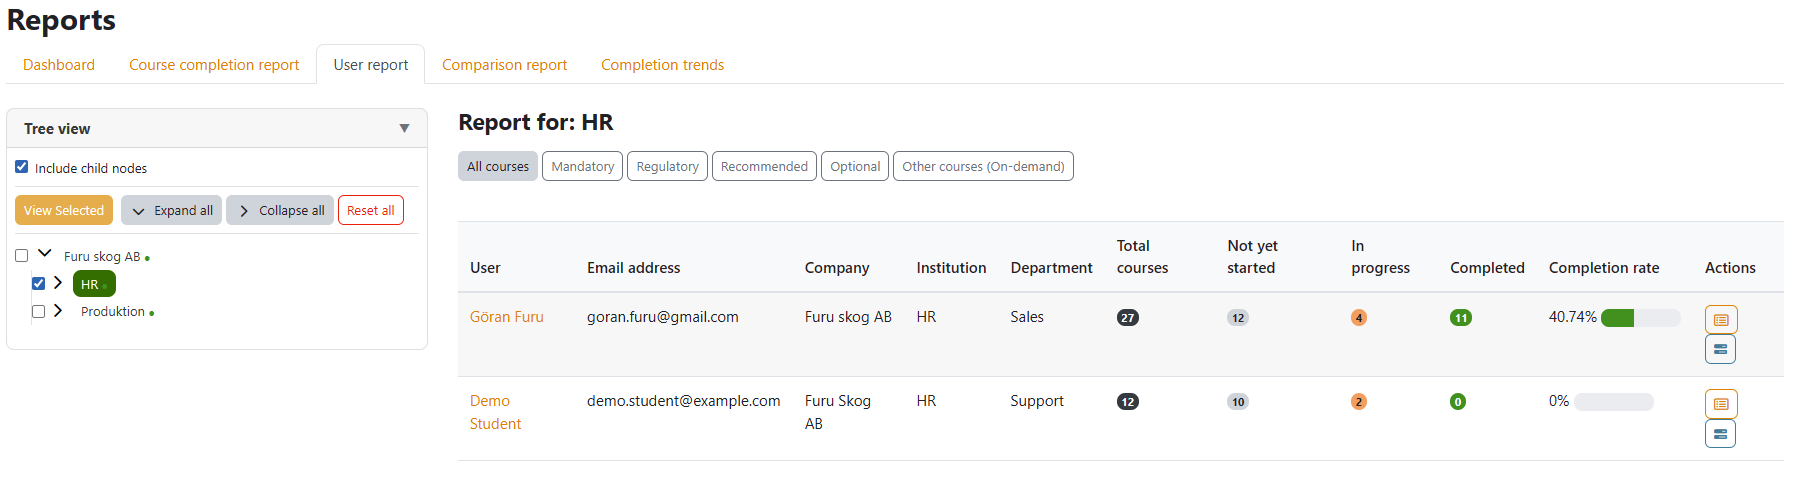
The User report page with the mini tree on the left and a table on the right. Columns include: Full name | Email | Department | Courses enrolled | Completed | In progress | Not started | Last access.
3.5 Comparison report
The Comparison report lets you select multiple nodes and view their completion
statistics side by side. Click nodes in the mini-tree while holding the checkboxes to
add them to the comparison.
Screenshot · screenshots/screen-03-05.png
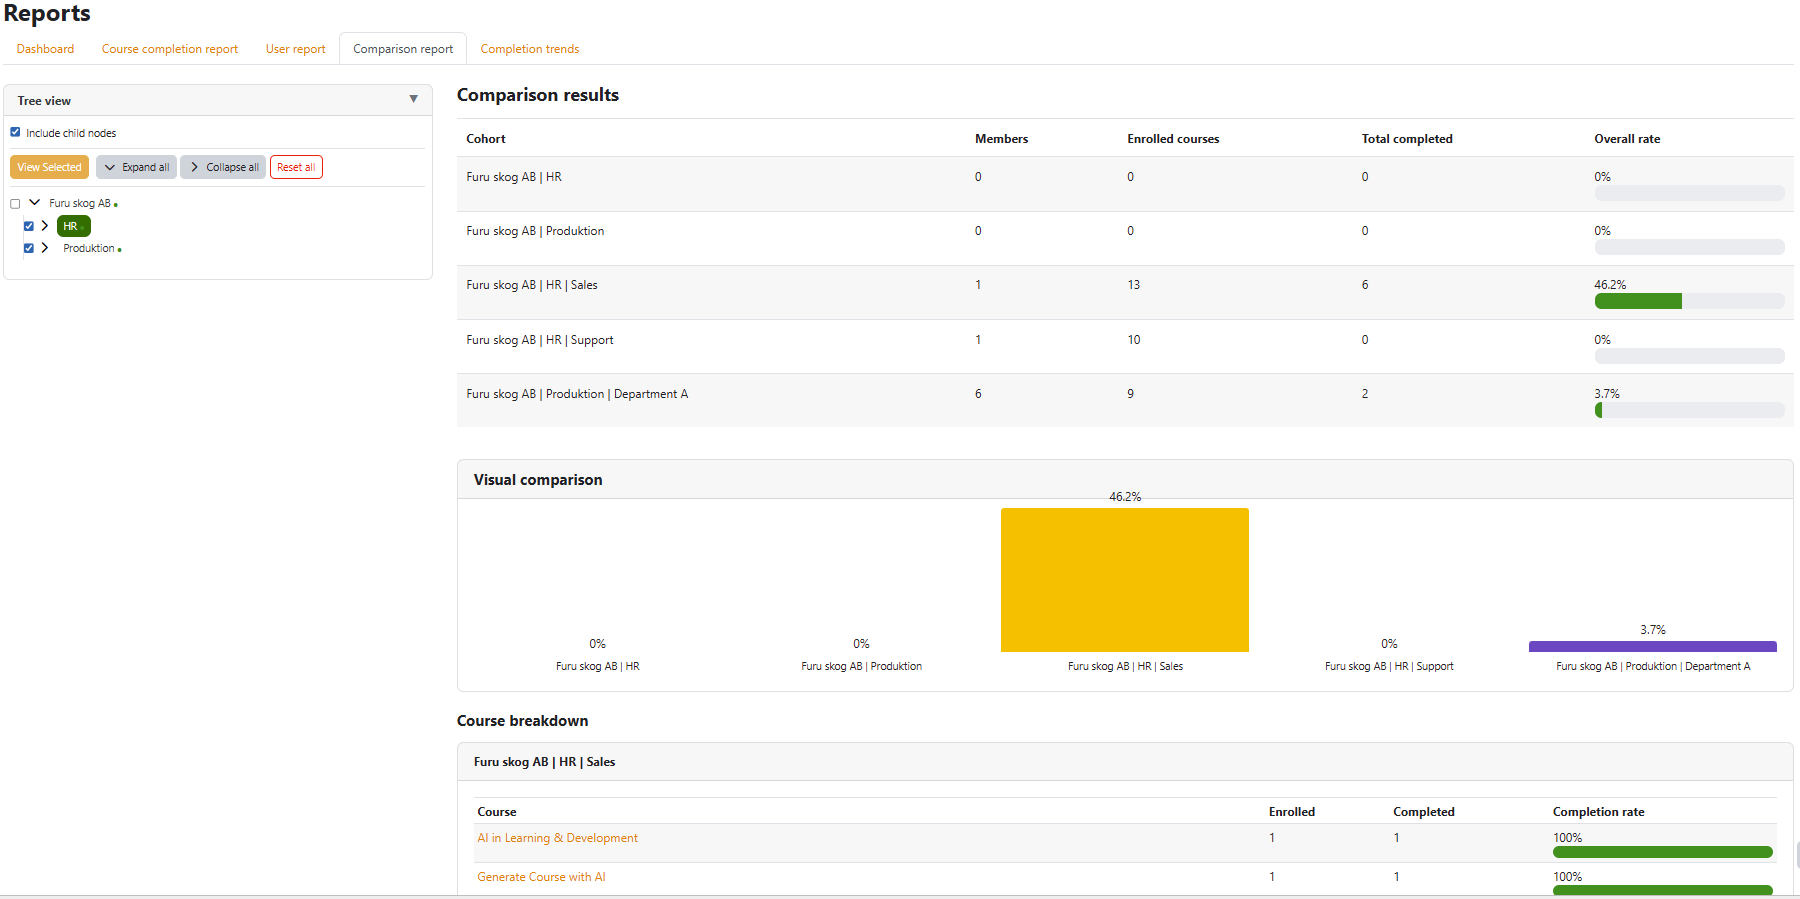
The Comparison report showing three nodes selected in the mini tree (with checkboxes ticked). The right-hand panel displays a comparison table with one column per node and rows for each metric.
3.6 Trends
The Trends tab shows how completion rates have changed over time for the selected node.
Choose a period — Weekly, Monthly, or
Quarterly — and the chart updates accordingly.
Screenshot · screenshots/screen-03-06.png
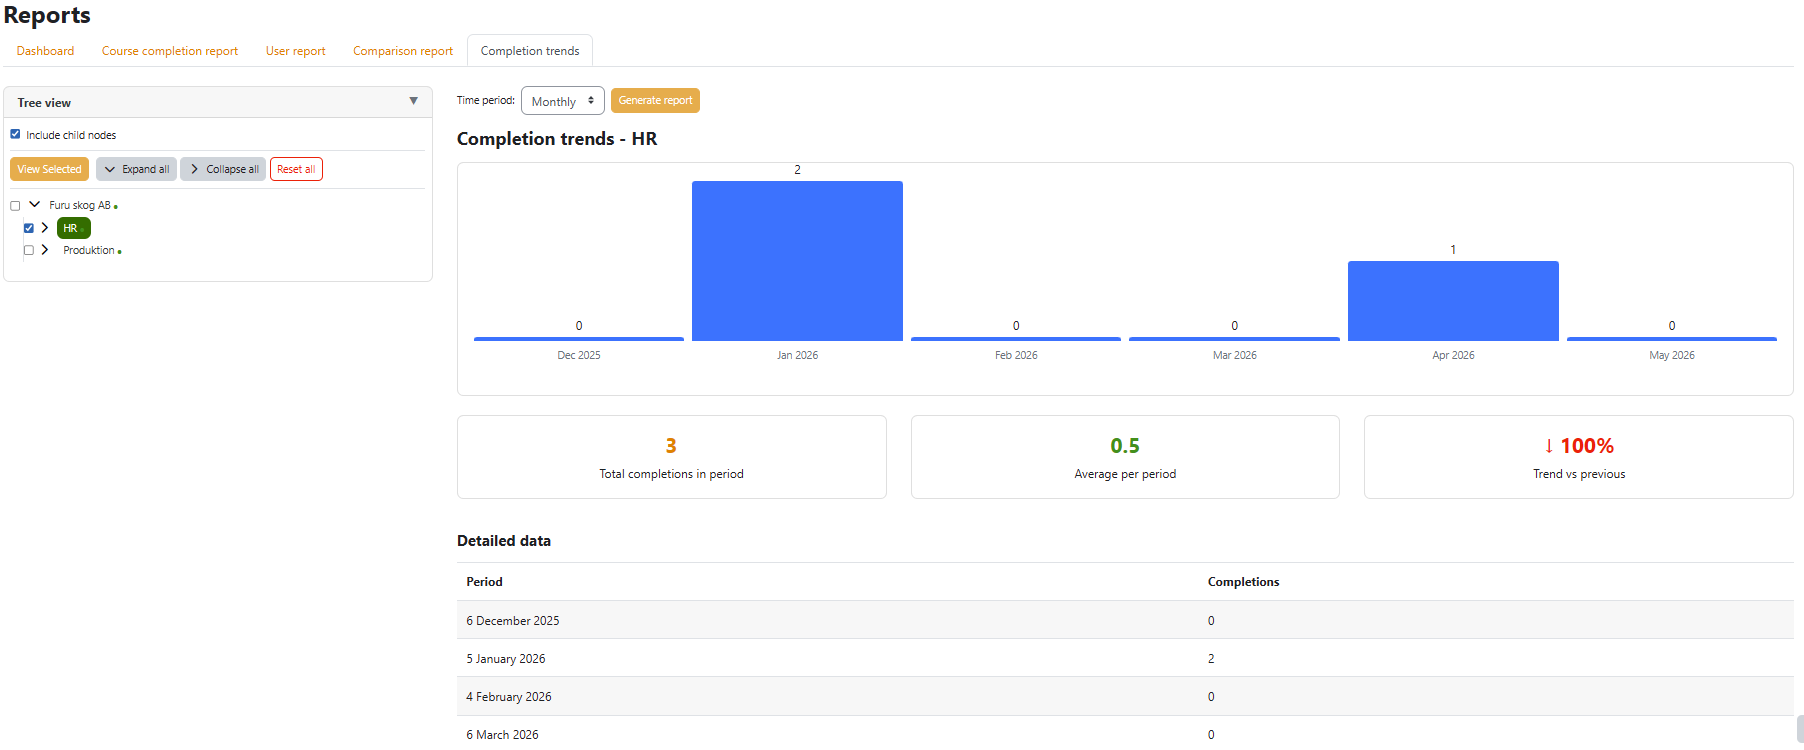
The Trends tab showing a line chart of completion percentage over time for a selected node. Below the chart, a detailed data table lists each period with counts.
3.7 Exporting reports
If your site administrator has granted the Export reports capability,
an Export CSV button appears at the top of each report
tab. Click it to download the currently displayed data as a comma-separated file,
ready for import into Excel or any spreadsheet application.
Screenshot · screenshots/screen-03-07.png
The top-right area of a report tab showing the "Export CSV" button next to the tab heading. The button is styled as a secondary action button.
Tip — Excel import: When opening the exported CSV in Excel via the
Get Data → From Text/CSV dialog, click Use First Row as Headers
in the Power Query editor before loading. This ensures the column names appear as table
headers.
A Node Enroller has all Node Reporter capabilities plus the ability to enrol and
unenrol cohorts to/from courses. Enrollers can access the Tree view and the Manage
courses & enrolments page for their assigned nodes. They cannot manage individual
cohort members or direct members, and cannot create, edit, or delete nodes.
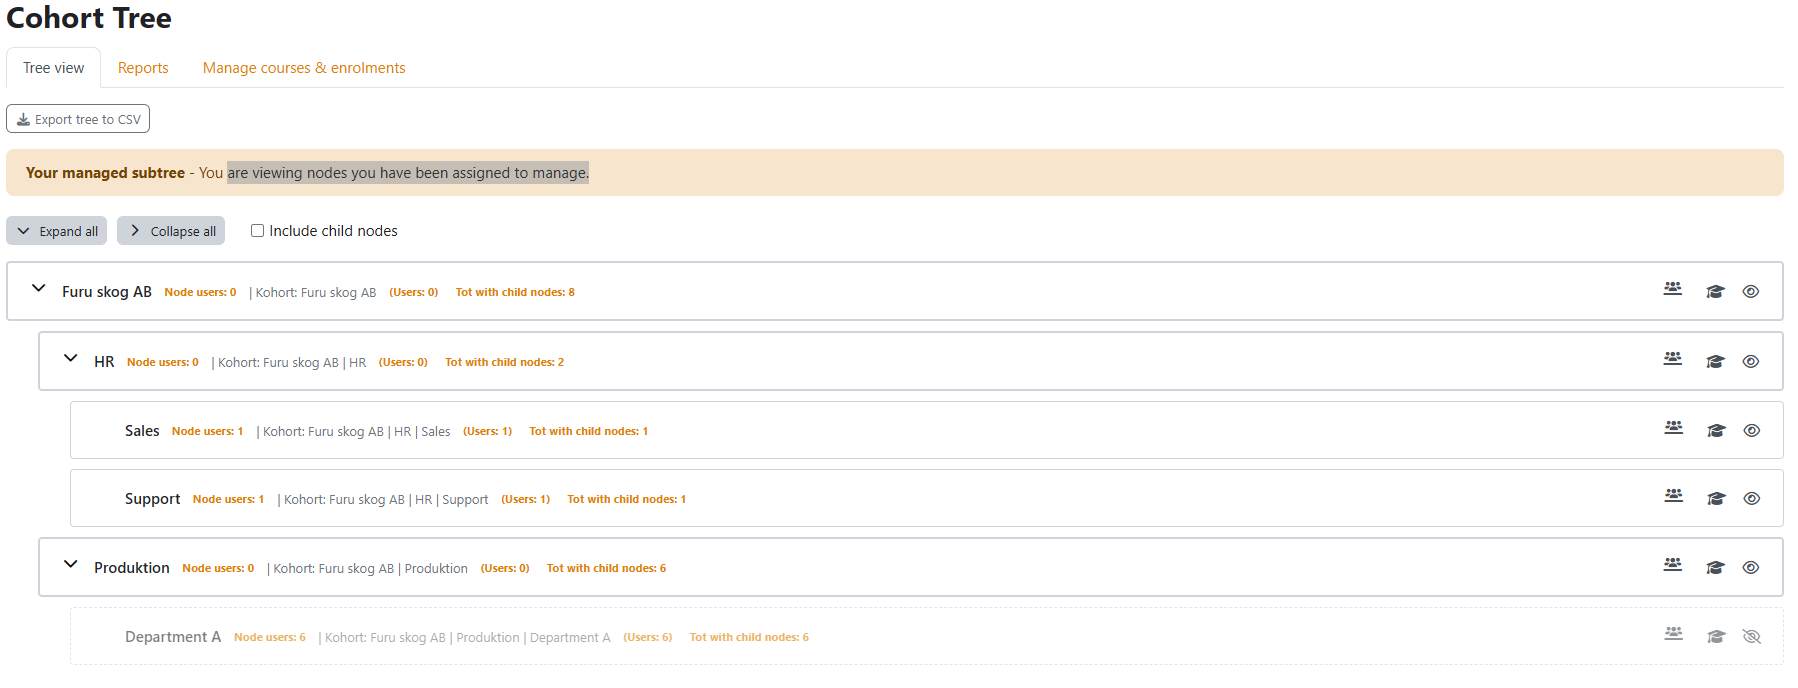
4.1 Tree view
Enrollers see the Tree view tab in addition to Reports
and Manage courses. The tree displays only the nodes they are assigned to plus all
descendants.
Screenshot · screenshots/screen-04-01.png
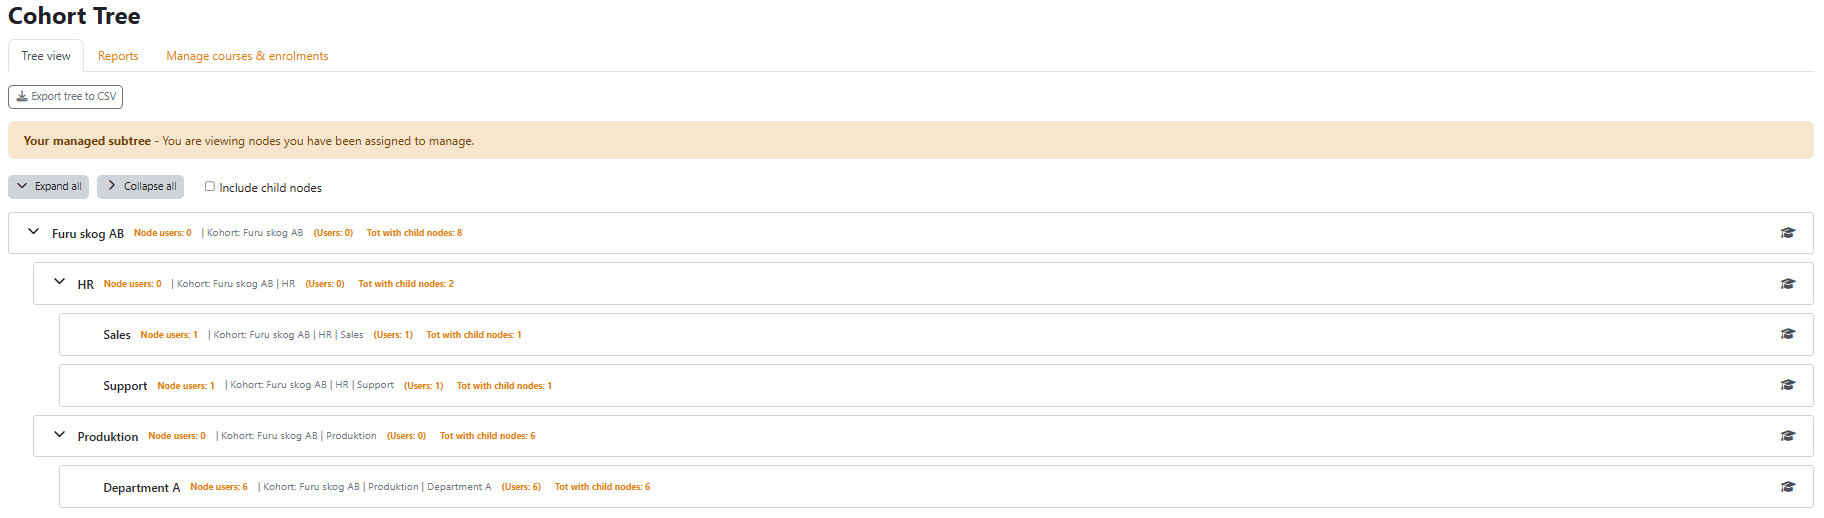
The Tree view page as seen by a Node Enroller. An info banner reads "Your managed subtree – You are viewing nodes you have been assigned to manage." The tree shows only the enroller's assigned nodes without parent/ancestor nodes.
Reading the tree badges
Each node row displays several information badges:
| Badge | Meaning |
|---|
Node users: N | Number of users in the node's linked cohort. Click to open the node users list modal. |
Direct: N | Number of users manually added as direct members of this node. |
Tot with child nodes: N | Total unique users in this node and all descendants combined. Click to open the total users modal. |
Cohort: [name] (N members) | Name and member count of the linked Moodle cohort. |
Tree toolbar
- Expand all — Expands every node in the tree.
- Collapse all — Collapses all nodes.
- Include child nodes checkbox — When ticked, the user count badges include all descendant nodes (the state is saved in the browser).
4.2 Manage courses & enrolments
Navigate to the Manage courses & enrolments tab.
The page is split into two columns:
- Left — Organisation tree: select one or more nodes using the checkboxes.
- Right — Course browser: browse and filter courses, then add them to a basket for bulk enrolment.
Screenshot · screenshots/screen-04-04.png
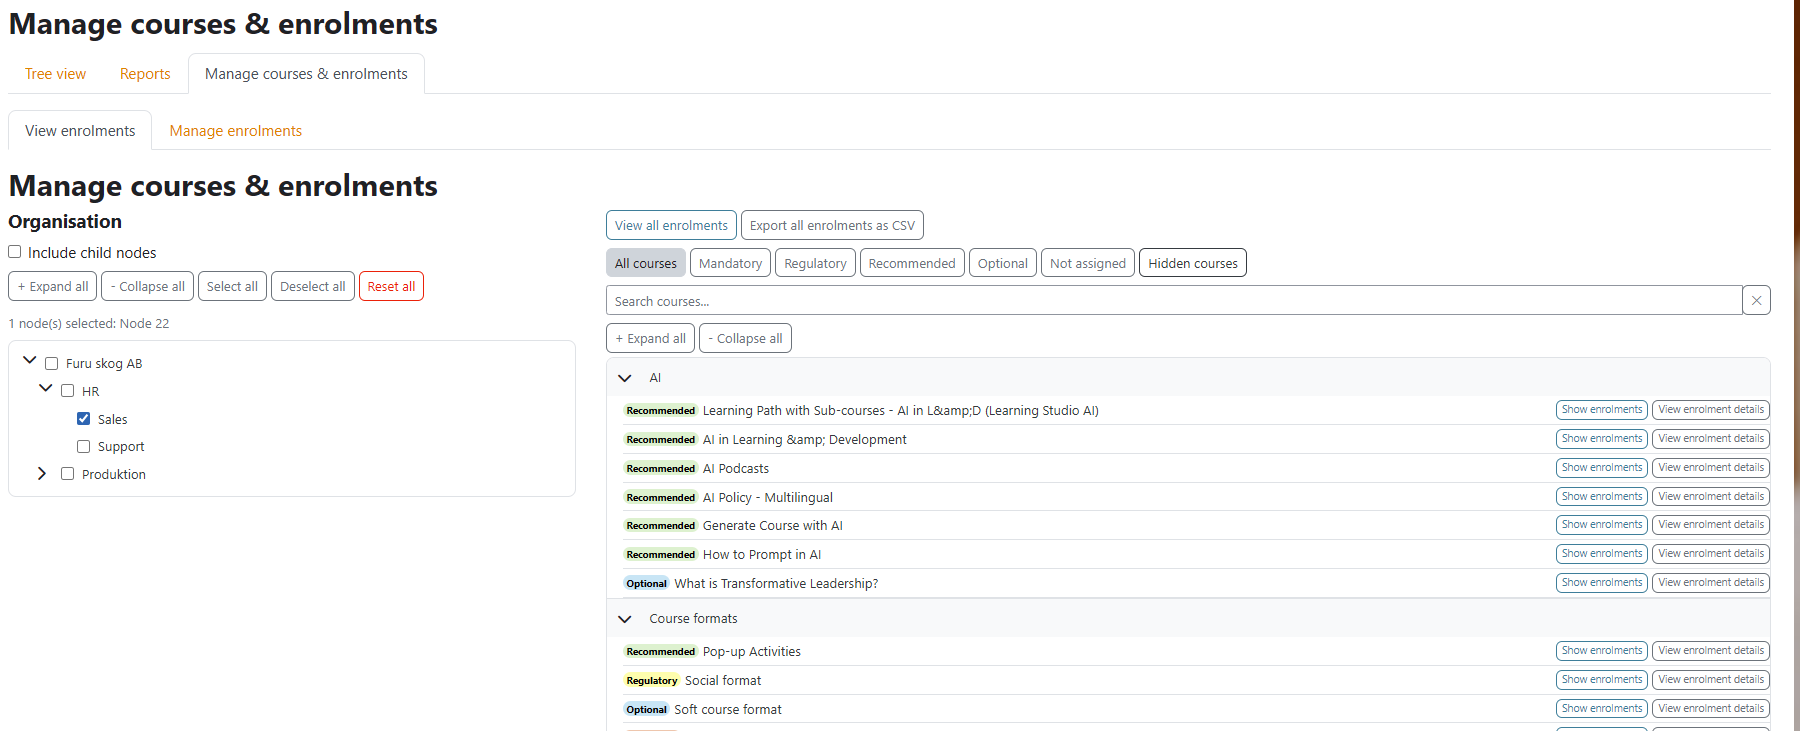
The Manage courses & enrolments page in two-column layout. The left column shows a scrollable tree with checkboxes. The right column shows course-type filter pills at the top, a search box, and an expandable category/course tree. A basket area above the course tree shows selected courses.
Left column — node selection
- + Expand all / − Collapse all — expand or collapse the node tree.
- Select all / Deselect all — toggle all nodes.
- Reset all — clears selection and all filters.
- Include child nodes checkbox — when ticked, enrolments apply to descendants too.
Right column — course browser
- Filter pills — filter the course list by course type (e.g. Mandatory, Optional), Not assigned, or Hidden courses.
- Search box — filter courses by name.
- Category tree — expand Moodle course categories to browse courses. Click a course to add it to the basket.
4.3 Enrolling cohorts to courses
- Tick one or more nodes in the left column.
- Browse the course tree on the right and tick the courses to enrol into.
- The basket at the top of the right column updates with the selected courses.
- Select the mode: Enrol or Unenrol.
- Click Apply.
- A confirmation dialog appears listing the selected courses (left) and selected nodes (right). Review and set the Role dropdown.
- Click Confirm to execute.
Screenshot · screenshots/screen-04-05.png
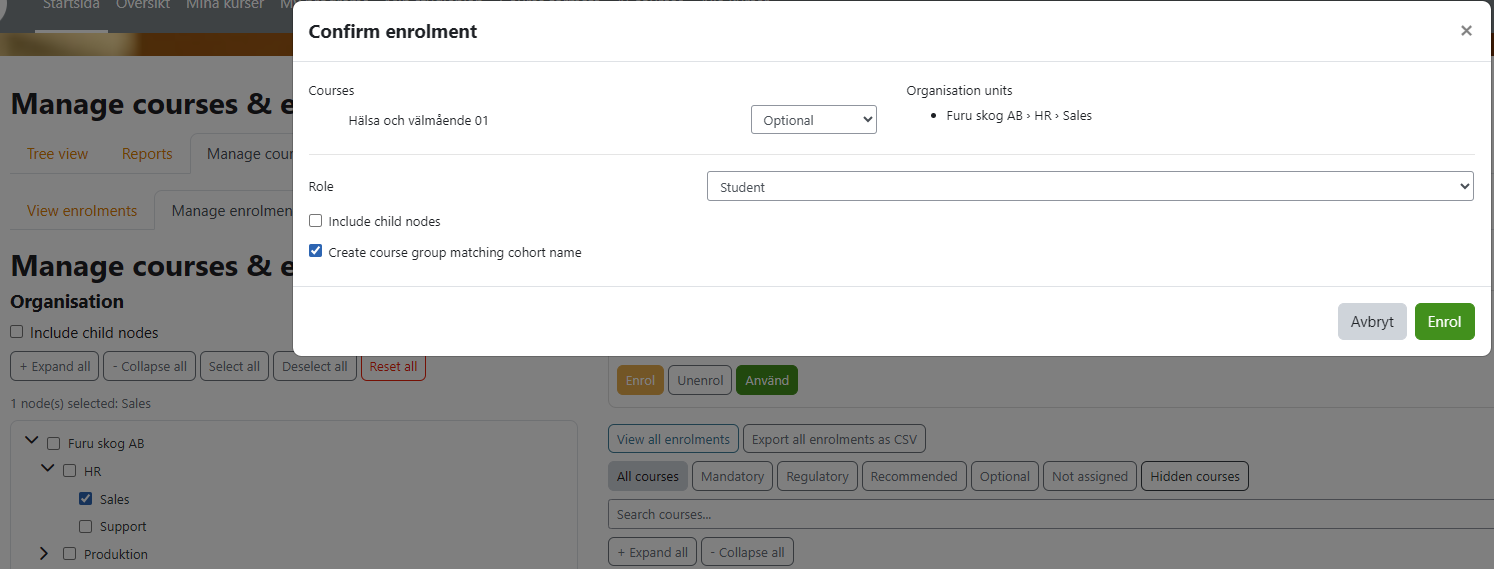
The enrolment confirmation modal. Left panel lists the selected courses with their names. Right panel lists the selected nodes. Below is a Role dropdown, an Include child nodes checkbox, and a Create course group checkbox. At the bottom: Confirm and Cancel buttons.
Warning — No cohort: If you select a node that has no linked cohort
and no virtual cohort, a warning dialog appears. Choose to create a cohort, cascade to
child nodes with cohorts, or skip those nodes.
A Node Manager has all Node Enroller capabilities plus the ability to link and unlink
cohorts to nodes, control node visibility, and manage cohort members and direct node
members within their assigned subtree. Node managers cannot create, edit, or delete
nodes, and cannot access the Virtual Cohorts page or plugin settings — those require
site administrator access.
5.1 Node visibility
Click the eye icon on a node to toggle its visibility. Hidden nodes
are shown with a strikethrough or greyed style in the tree and are excluded from reports
visible to reporters and enrollers. Node managers and administrators always see all nodes.
Screenshot · screenshots/screen-05-02.png

Two rows in the tree: one node shown with normal styling labelled "Visible" and a second node with a greyed-out name labelled "Hidden". The eye-slash icon is highlighted on the hidden node.
5.2 Assigning cohorts to nodes
Click the cohort icon next to a node to manage the cohort linked
to that node. The cohort management page lets you:
- Search for an existing Moodle cohort and link it to this node.
- Remove the current cohort link (the cohort itself is not deleted).
- Create a new cohort to link directly from this page.
Screenshot · screenshots/screen-05-03.png
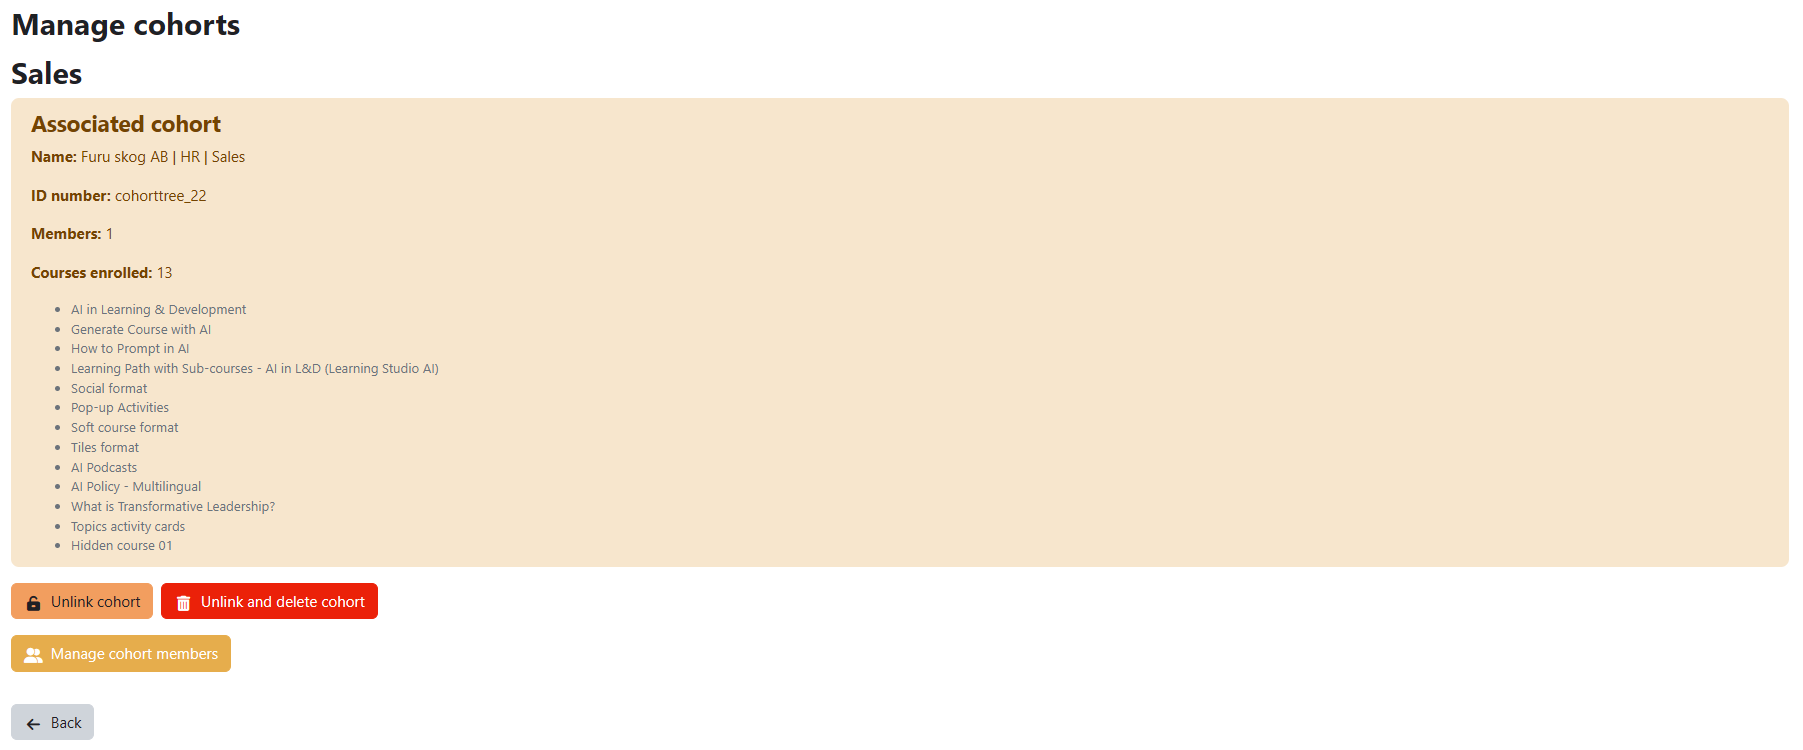
The cohort management page for a node showing the current linked cohort name at the top, a search-and-select control to find a different cohort, and a Remove link button.
5.3 Managing cohort members
When a node has direct members but no linked cohort (and no auto-sync), the plugin
can create a virtual cohort automatically. To trigger this:
- Add at least one direct member to the node (see section 4.3).
- If the node has no cohort, a virtual cohort is created automatically in the background.
- The node now shows a VC badge in the tree, and the virtual cohort
appears on the Virtual Cohorts page (visible to site administrators).
Note: Virtual cohorts are named automatically and managed by the
plugin. Do not edit them manually in Moodle's Cohort manager.
5.6 Exporting the tree to CSV
The Export tree to CSV button at the top of the Tree
view page exports every node in the visible subtree — one row per user — to a CSV file.
Exported columns:
| Column | Content |
|---|
| Node level 1 … N | Node name at each level of the hierarchy (number of columns matches the actual tree depth). |
| First name | User's first name. |
| Last name | User's last name. |
| Email | User's email address. |
| Type | Cohort, Direct, or Cohort & Direct (indicates how the user belongs to the node). |
| Assigned role | Node Manager, Node Enroller, Node Reporter, or None. |
| Visibility | Visible or Hidden. |
Screenshot · screenshots/screen-05-04.png
A spreadsheet view of the exported cohort_tree_export CSV file. The first row contains column headers (Node level 1, Node level 2, Node level 3, First name, Last name, Email, Type, Assigned role, Visibility). Subsequent rows contain one user record each.
Site administrators have unrestricted access to all plugin pages and functionality,
including creating and editing any node in the tree, the Virtual Cohorts page, the
Auto-sync wizard, and all plugin settings.
6.1 Full tree access
Administrators see the complete tree — all nodes, including hidden ones — without any
subtree restriction. All per-node action icons are visible and active on every node.
In addition to the badges available to managers, administrators see:
M:N E:N R:N badge — counts of node managers, enrollers, and reporters assigned to each node.- Clicking the badge opens the Node managers modal showing direct and inherited manager assignments.
Screenshot · screenshots/screen-06-01.png
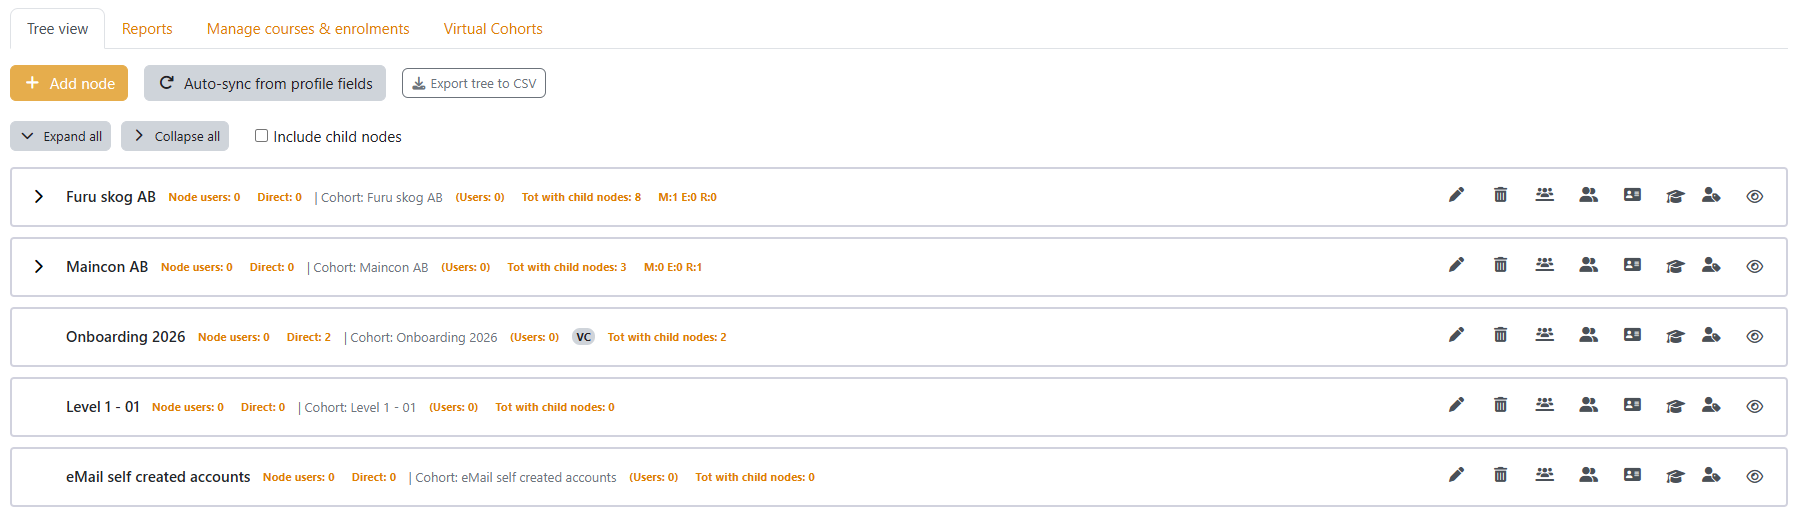
The Tree view page as seen by a site administrator. Every node shows the full set of action icons (edit, delete, cohort, users, direct members, enrol, assign managers, toggle visibility) plus all the member count badges including the M/E/R manager count badge.
6.2 Creating and editing nodes
Creating a new node
- Go to the Tree view tab.
- Click the + Add node button in the top-right toolbar.
- Fill in the node form:
- Name — the display name of the node (required).
- Description — optional longer description.
- Parent node — where in the hierarchy this node sits. Select Root to create a top-level node.
- Sort order — position among siblings (lower numbers appear first).
- ID number — optional identifier for matching with profile fields during auto-sync.
- Visible — whether the node is visible to enrollers and reporters.
- Click Save.
Screenshot · screenshots/screen-05-01.png
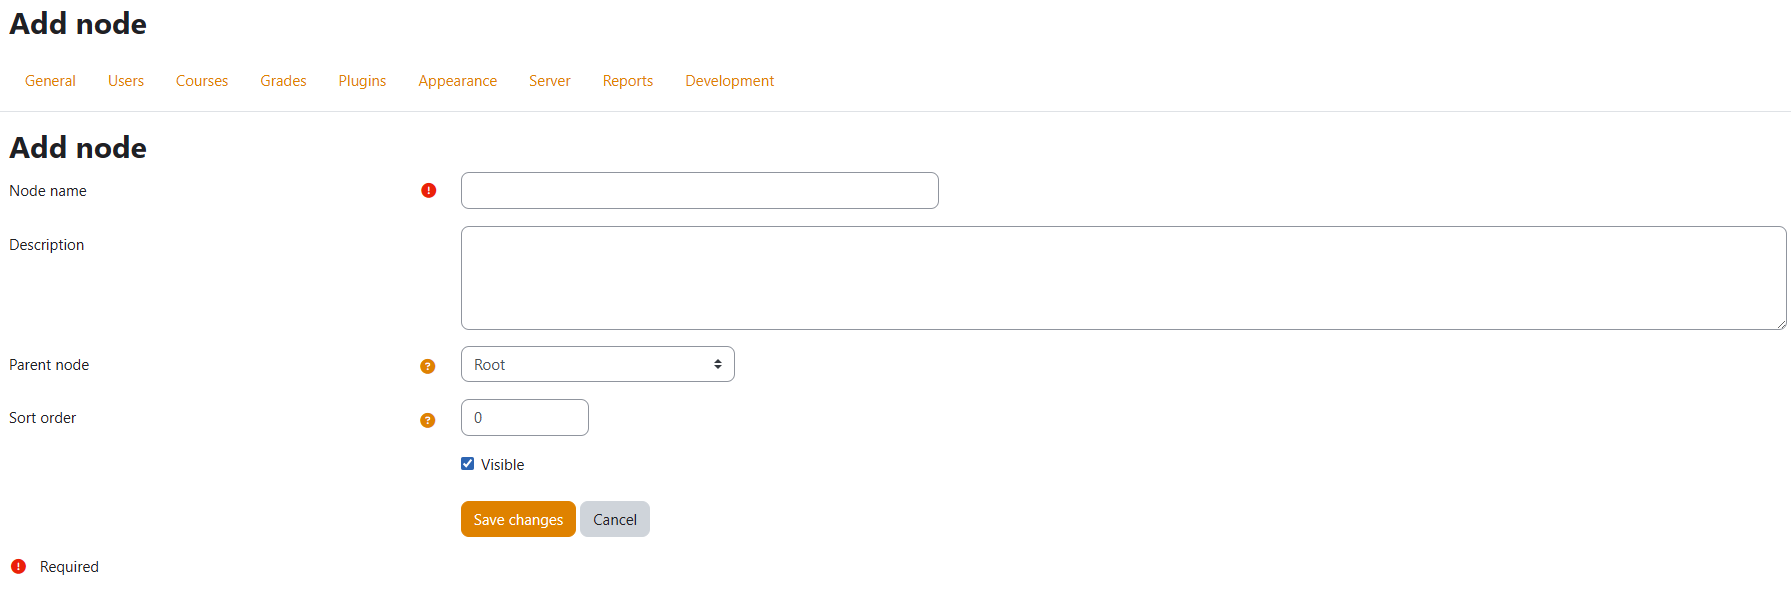
The Add / Edit node form showing the Name, Description (rich text editor), Parent node dropdown, Sort order, ID number, and Visible checkbox fields. Save and Cancel buttons are at the bottom.
Editing an existing node
Click the pencil (edit) icon next to the node name in the tree.
The same form opens pre-filled with the current values. Change any field and click
Save.
6.3 Deleting nodes
Click the trash (delete) icon next to a node. A confirmation dialog
appears. Confirm to permanently remove the node.
Warning: Deleting a node removes it and all its descendant nodes,
their cohort links, and enrolment records. Moodle cohorts themselves are not
deleted — only the plugin's link to them is removed. This action cannot be undone.
6.4 Assigning node managers
Click the assign roles icon (person with a badge) on any node to
open the node managers management page.
Screenshot · screenshots/screen-06-02.png

The Manage node managers page for a node. A "Current managers" table lists assigned users with their name, email, and role type (Manager / Enroller / Reporter) plus a Remove button. Below it an "Add manager" section has a user search dropdown and a role selector.
Adding a node manager
- On the Manage node managers page, use the user search field to find the user.
- Select the role type: Manager, Enroller, or Reporter.
- Click Assign manager.
Role inheritance: A role assigned at a parent node automatically
applies to all descendant nodes. If a user has a direct assignment at a child node,
that assignment takes precedence over the inherited one.
Removing a node manager
Click Remove next to the user in the Current managers
table. Confirm the removal in the dialog that appears. The user loses access to that
node and all its descendants (unless they have an inherited assignment from a
higher-level node).
Prerequisite: A user must have the
local/cohorttree:managesubtree capability before they can be assigned as
a node manager. Ask your administrator to grant this capability to the appropriate role
in Site Administration → Users → Permissions → Define roles.
6.5 Virtual Cohorts page
Navigate to the Virtual Cohorts tab. This page lists
all nodes that have a virtual cohort — i.e. nodes with direct members but no auto-sync
cohort.
Screenshot · screenshots/screen-06-03.png

The Virtual Cohorts page showing a table with columns: Institution | Department | Level 3 | Level 4 | Cohort members | Courses enrolled | Actions. Two action buttons appear in each row: "Manage members" and "Remove virtual cohort".
Removing a virtual cohort
- Find the virtual cohort row in the table.
- Click Remove virtual cohort.
- Confirm the action in the dialog. The dialog explains that members will keep their
course access (switched to manual enrolment) but the node returns to a
"no cohort" state.
Tip: Use Manage members to navigate
directly to the node's direct-members modal in the Tree view.
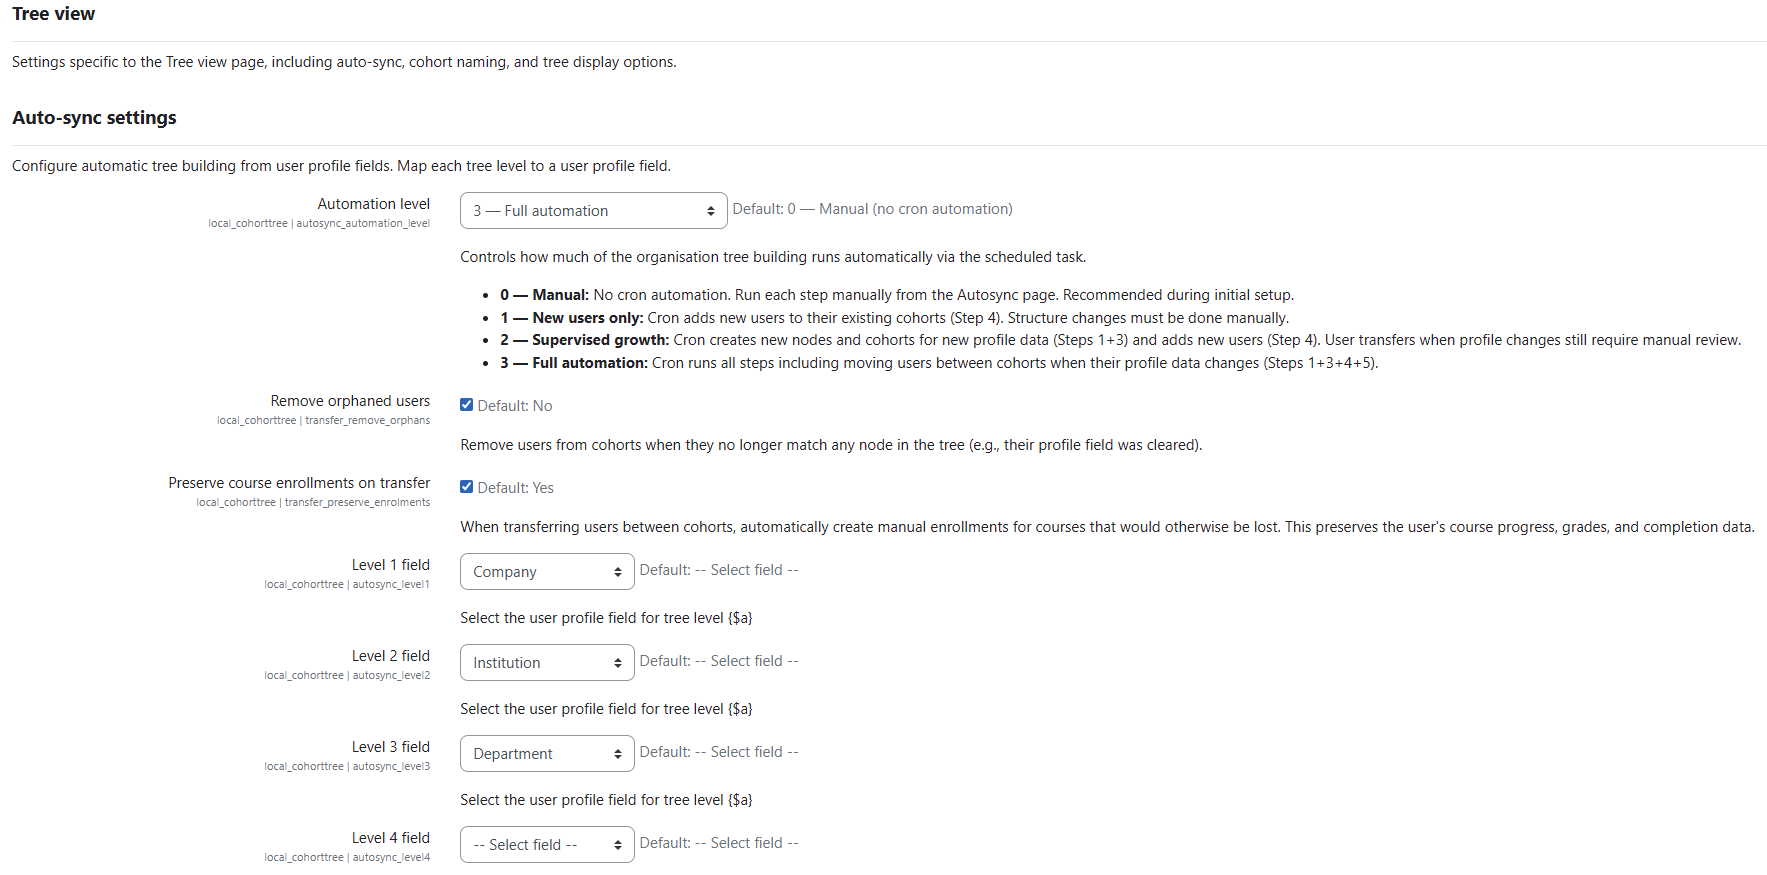
6.6 Auto-sync
Auto-sync builds and maintains the tree automatically from Moodle user profile fields.
Navigate to Auto-sync from the Tree view toolbar (site
administrators only).
Screenshot · screenshots/screen-06-04.png
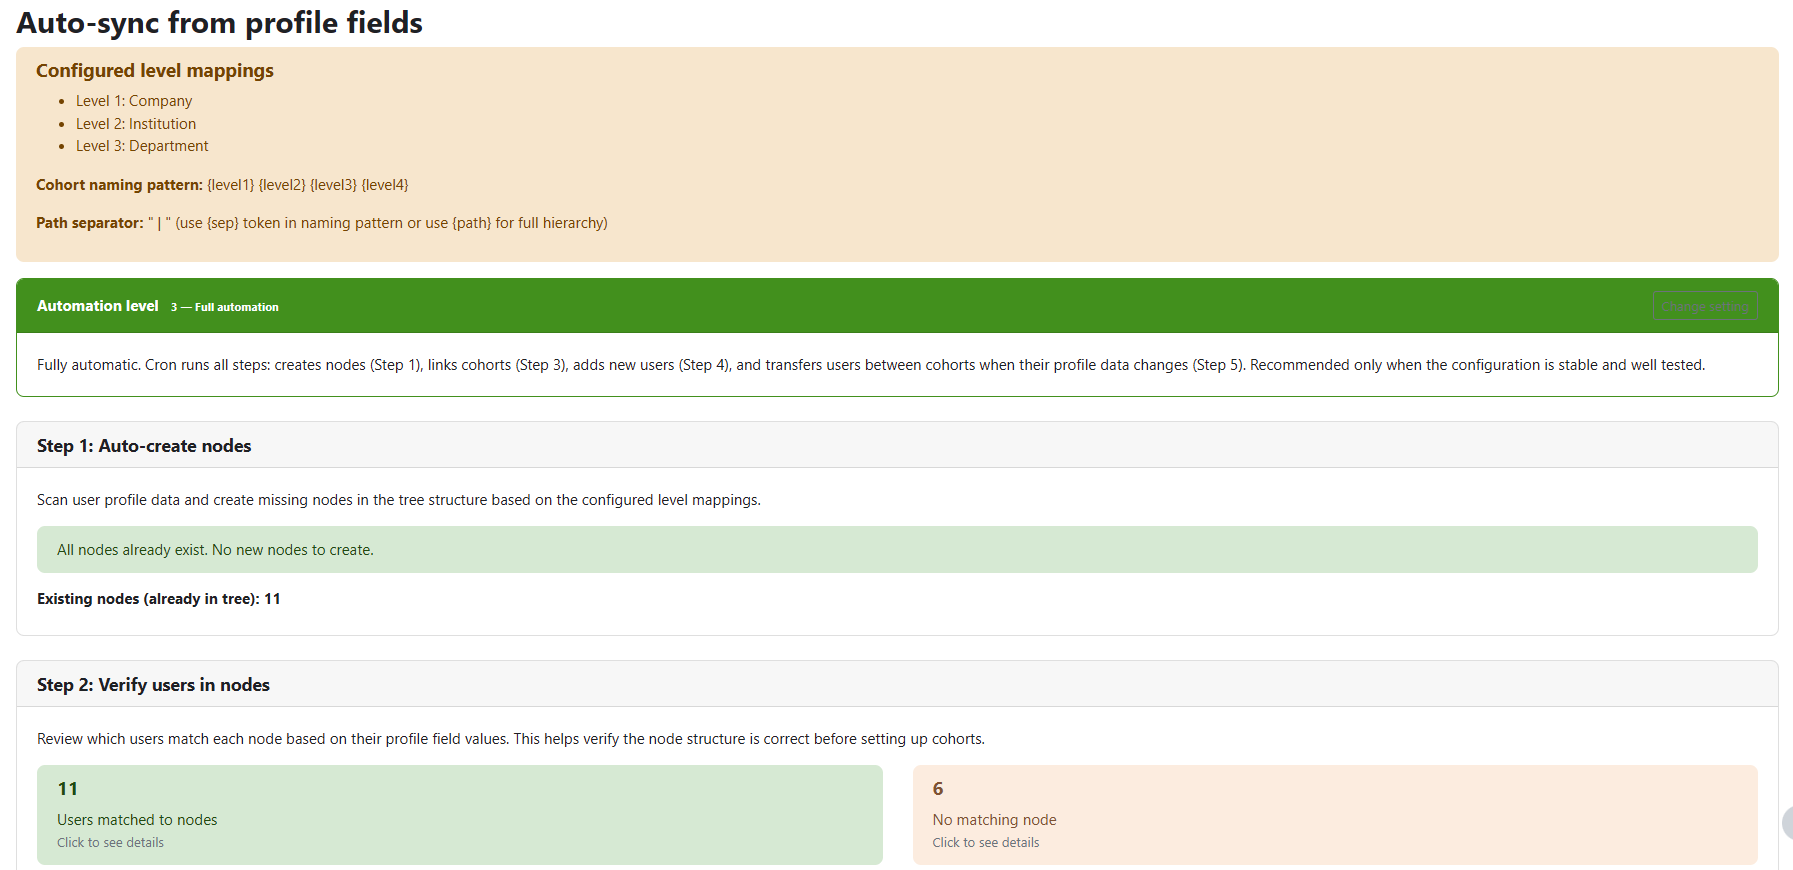
The Auto-sync page showing five numbered steps listed vertically: 1 Create nodes, 2 Verify users, 3 Link cohorts, 4 Sync users, 5 Transfer users. Each step has a Run button and a status indicator.
Auto-sync runs in five sequential steps:
| Step | Description |
|---|
| 1 — Create nodes | Reads all user profile field combinations and creates missing nodes in the tree. |
| 2 — Verify users | Checks that all users still match their node based on current profile data. |
| 3 — Link cohorts | Creates and links Moodle cohorts to nodes that do not yet have one. |
| 4 — Sync users | Adds users to cohorts based on their profile field values. |
| 5 — Transfer users | Moves users between nodes if their profile fields have changed. |
Warning: Auto-sync is a data-modifying operation. Run Step 1 first on a
test environment before applying to production. Steps can be run individually or all at
once depending on the automation level configured in the plugin settings.
6.7 Plugin settings
Go to Site Administration → Plugins → Local plugins → Cohort Tree Manager
to access all plugin settings. See the full Settings reference
in section 8.
Screenshot · screenshots/screen-06-05.png
The plugin settings page in Site Administration showing the grouped sections: Appearance (button colours, node colours), Tree view (level fields, cohort naming), Reports (caching, display options), and Manage courses (default role, group creation).
7 Capability reference
Two tables are shown below. The first covers the Moodle role capability
that must be set in a role definition. The second shows the plugin action matrix
— what each internal plugin role type can do once the Moodle capability gate is passed.
Site administrators can adjust Moodle role capabilities in
Site Administration → Users → Permissions → Define roles.
The action matrix defaults are configurable in the plugin settings (available from v2.2.129).
Moodle role capabilities
| Capability |
Description |
Student |
Reporter |
Enroller |
Manager |
Admin |
:viewownreports |
View personal completion dashboard. |
✔ |
✔ |
✔ |
✔ |
✔ |
:managesubtree |
Gate capability — must be granted in the Moodle role for all three plugin roles (Reporter, Enroller, Manager). The plugin's internal role type then controls what each user can actually do. |
— |
✔ |
✔ |
✔ |
✔ |
:managetree |
Full admin — creates, edits, and deletes any node. Bypasses all node-level role checks. Granted automatically to site administrators. |
— |
— |
— |
— |
✔ |
Configuration tip: Create a single Moodle role (e.g. "Cohort Tree User")
with only local/cohorttree:managesubtree = Allow. Assign it system-wide to
all users who will be node reporters, enrollers, or managers. Then use the plugin's
Manage node managers page to assign each user's specific role type
(Reporter / Enroller / Manager) on the appropriate node.
Plugin action matrix (default settings)
Once a user passes the managesubtree gate, the following actions are
available based on their assigned role type. These defaults are configurable in
Site Administration → Plugins → Cohort Tree Manager → Node role capability matrix
(available from v2.2.129).
| Action |
Reporter |
Enroller |
Manager |
Admin |
| View reports |
✔ |
✔ |
✔ |
✔ |
| Export reports as CSV |
✔ |
✔ |
✔ |
✔ |
| Enrol / unenrol cohorts to courses |
— |
✔ |
✔ |
✔ |
| Link / unlink cohort to node |
— |
— |
✔ |
✔ |
| Toggle node visibility |
— |
— |
✔ |
✔ |
| Manage cohort members |
— |
— |
✔ |
✔ |
| Manage direct node members |
— |
— |
✔ |
✔ |
| Create / edit / delete nodes |
— |
— |
— |
✔ |
| Assign node managers |
— |
— |
— |
✔ |
| Virtual Cohorts page |
— |
— |
— |
✔ |
All node-level actions are scoped to the user's assigned node and its descendants only.
A node manager cannot access nodes outside their assigned subtree.
8 Settings reference
All settings are in Site Administration → Plugins → Local plugins →
Cohort Tree Manager. Only site administrators can change them.
Appearance
| Setting | Description | Default |
|---|
| Primary button background | Background colour of primary action buttons throughout the plugin. | #f0ad4e |
| Primary button text colour | Text colour on primary buttons. | #ffffff |
| Button border radius | CSS border-radius applied to all buttons (e.g. 6px, 20px). | 6px |
| Active node background | Background colour of the selected/active node in the mini-tree (Reports + Manage courses). | #0f6cbf |
| Active node text colour | Text colour on the active node. | #ffffff |
| Other courses background | Background colour of the "Other courses" section badge/pill. | #d1d2de |
| Other courses text colour | Text colour in "Other courses" pill. | #000000 |
| Other courses label | Display label for the "Other courses" section. | Other courses |
Tree view
| Setting | Description | Default |
|---|
| Level 1–4 profile fields | Which Moodle user profile field maps to each tree level (e.g. Institution → Level 1, Department → Level 2). Used by auto-sync and displayed in reports. | (none) |
| Show member count badges | Show/hide the "Node users: N" count badges on the tree. | On |
| Expand tree by default | When On, the tree opens fully expanded on every page load. | Off |
| Node indentation | Horizontal indent in pixels per tree level. | 32 px |
| Cohort naming pattern | Template for auto-generated cohort names. Tokens: {level1} … {level4}, {leaf}, {sep}. | {level1}{sep}{level2} |
| Path separator | Separator character between levels in the cohort naming pattern. | — |
| Sync direct members to real cohort | Never: direct members tracked in plugin only. Always: direct members are also added to the node's real Moodle cohort. | Never |
| Auto-sync automation level | 0 = Manual (cron disabled). 1 = Create nodes only. 2 = Supervised growth. 3 = Full automation (all five steps run on cron). | 0 |
| Enable manual Step 2 | When On, the Verify users step (Step 2) is available in the manual auto-sync interface. | Off |
| Transfer: remove orphans | During Step 5, remove users from nodes whose profile data no longer matches. | Off |
| Transfer: preserve enrolments | During Step 5, keep course enrolments when moving a user to a new node. | On |
Reports
| Setting | Description | Default |
|---|
| Enable report caching | Cache report query results to reduce database load on large trees. | On |
| Cache TTL | How long (in seconds) to keep cached report data. | 3 600 s (1 hour) |
| Show email in modals | Show email address column in user list modals. | On |
| Show org levels in modals | Show the Level 1–4 columns in user list modals. | On |
| Show last access in modals | Show the Last access column in user list modals. | On |
Manage courses & enrolments
| Setting | Description | Default |
|---|
| Default enrolment role | Pre-selected role in the enrolment confirmation dialog. | Student |
| Course types | One label per line (e.g. Mandatory, Optional). Adds coloured filter pills to the course browser. Order determines type index (0-based). | (empty) |
| Create course group matching cohort name | When On, enrolment also creates a Moodle course group named after the cohort. | On |
9 Manage organisations block (block_cohorttree)
9.1 Overview & requirements
The Manage organisations block (block_cohorttree v1.0.11)
is a companion Moodle block that provides a tile-based navigation dashboard for the
Cohort Tree Manager plugin. Rather than navigating through site menus, users can access
all relevant plugin pages with a single click directly from their dashboard or any
Moodle page where the block is placed.
The block detects the current user's role automatically and shows only the tiles
relevant to that role — a student sees only the Reports tile, while a site administrator
sees all four tiles including Settings.
Requirement: block_cohorttree requires
local_cohorttree (Moodle 4.5+) to be installed. The block will not display
any content if the local plugin is absent.
Screenshot · screenshots/screen-09-01.png

The Manage organisations block as seen by a site administrator, showing four tiles in a 2×2 grid: "Manage organisation structure" (sitemap icon), "Manage courses & enrolments" (graduation cap icon), "Reports" (bar chart icon), and "Settings" (cogs icon). Each tile has a coloured background with an icon and label.
9.2 Adding the block to a page
Adding to a course or site page
- Turn editing on for the page (or site dashboard).
- Click Add a block in the block drawer.
- Select Manage organisations from the list.
- The block appears immediately with tiles appropriate for your role.
- Optionally click the block's gear icon → Configure Manage organisations block to customise colours (see section 9.4).
Adding to My Dashboard (personal page)
- Go to your Dashboard (Home → Dashboard).
- Click Customise this page (top right).
- Click Add a block and select Manage organisations.
- Click Stop customising this page when done.
Tip for administrators: Use Site Administration → Appearance →
Default Dashboard page to pre-add this block to every user's dashboard so they
see it without having to add it themselves.
9.3 Tiles by role
The block renders between one and four tiles depending on the user's permissions in the
Cohort Tree Manager. The table below shows which tiles each role sees.
| Tile |
Destination page |
Student |
Reporter |
Enroller |
Manager |
Admin |
| Reports (bar chart icon) |
Reports dashboard |
✔ |
✔ |
✔ |
✔ |
✔ |
| Manage organisation structure (sitemap icon) |
Tree view |
— |
— |
✔ |
✔ |
✔ |
| Manage courses & enrolments (graduation cap icon) |
Manage courses page |
— |
— |
✔ |
✔ |
✔ |
| Settings (cogs icon) |
Plugin admin settings |
— |
— |
— |
— |
✔ |
Note — Node Reporter: Although reporters have a node assignment in the
Cohort Tree Manager, the block intentionally shows them only the Reports tile.
The management tiles require at least the Enroller role on one node.
9.4 Per-instance configuration
Each block instance on a page can have its own colour scheme, independently of the
site-wide defaults. Click the block's gear icon → Configure Manage organisations
block to open the settings form.
Uniform colour scheme (default)
When Use individual colours per tile is unchecked, a single set of
colour fields applies to all tiles:
| Field | Description | Default |
|---|
| Tile background | Background colour of all tiles at rest. | #ffffff |
| Tile text colour | Label text colour on all tiles. | #212529 |
| Tile icon colour | Icon colour on all tiles. | #212529 |
| Tile border colour | Border colour drawn around each tile. | #dee2e6 |
| Border radius | CSS value for tile corner rounding (e.g. 6px, 1rem). | 6px |
| Hover background | Background colour when the mouse is over a tile. | #0f6cbf |
| Hover text colour | Label text colour on hover. | #ffffff |
| Hover icon colour | Icon colour on hover. | #ffffff |
Individual tile colours
Check Use individual colours per tile to reveal four separate colour
groups — one per tile (Manage structure, Manage courses, Reports, Settings). Each group
has the same eight fields as the uniform scheme, allowing every tile to have a distinct
visual identity.
Tip: Leave any colour field blank in the per-instance form to inherit
the value from the site-wide admin default. This lets you override only the fields you
want to change.
9.5 Admin settings
Site administrators can define site-wide colour defaults that apply to all block
instances unless overridden per-instance. Go to
Site Administration → Plugins → Blocks → Manage organisations.
Screenshot · screenshots/screen-09-05.png
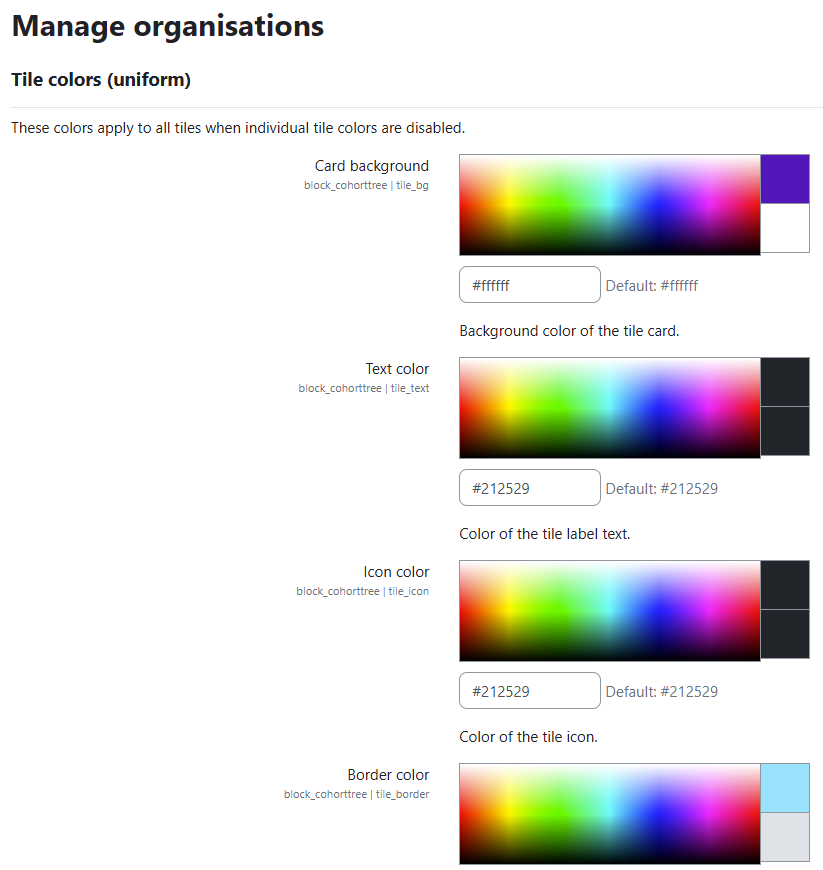
The block's admin settings page in Site Administration showing the "Appearance defaults" section. A "Use individual colours per tile" checkbox is at the top, followed by uniform colour pickers. Below, four collapsed tile sections (Manage structure, Manage courses, Reports, Settings) each expand to reveal six per-tile colour pickers.
The admin settings mirror the per-instance configuration form exactly. Settings defined
here become the defaults for every new block instance and any instance that has not
overridden a particular field.
9.6 Block capability reference
| Capability |
Description |
Student |
Teacher |
Editing Teacher |
Manager |
Admin |
block/cohorttree:addinstance |
Add the block to a course or site page (requires edit-mode access). |
— |
— |
✔ |
✔ |
✔ |
block/cohorttree:myaddinstance |
Add the block to the personal My Dashboard page. |
✔ |
✔ |
✔ |
✔ |
✔ |
10 Change log
Full version history from v2.2.126. Versions marked (fix) address bugs found in the preceding release.
| Version |
Date |
Changes |
| v2.2.133 (fix) |
2026-05-06 |
cohort.php — "Manage cohort members" button is now hidden when the
manageusers capability is not granted to the user's role. Previously the
button was shown to any user with managecohorts, bypassing the matrix setting.
|
| v2.2.132 (BETA, fix) |
2026-05-06 |
index.php — Auto-sync button moved to its own managetree
guard; no longer visible to node managers with createnodes.
edit_node_form.php — Parent node dropdown filtered to accessible subtree
for non-admins; root-level option removed for delegated managers.
ajax_reports.php — searchcohortcandidates and
searchnodeusercandidates: candidate pool expanded from target-node subtree
to the manager's full assigned subtree via get_all_managed_node_ids(),
ensuring new empty child nodes show candidates.
|
| v2.2.131 (fix) |
2026-03-27 |
edit.php — Add node access check falls back to
has_cap_on_any_node('createnodes') when no parent node is pre-selected
(previously threw a permissions error because checknodeid was 0).
|
| v2.2.130 (fix) |
2026-03-27 |
node_manager.php — Namespace bug in has_cap_on_any_node():
context_system referenced as \context_system to resolve correctly
inside the local_cohorttree namespace.
|
| v2.2.129 |
2026-03-27 |
Configurable admin-only actions. All four previously hard-coded
admin-only actions (Create/edit nodes, Delete nodes, Assign node managers, Virtual
Cohorts page) added to the capability matrix as configurable rows.
node_manager.php — New has_cap_on_any_node() helper.
get_role_capabilities() configurable list extended to all 9 capabilities.
index.php, edit.php, managers.php, virtual_cohorts.php — Access gates
updated to check can_do() for the four new delegatable capabilities.
admin_setting_roleperms.php — adminonlyrows parameter
made optional; all rows now configurable.
|
| v2.2.128 |
2026-03-27 |
Node manager member management. manageusers added to the
manager role's default capability set in ROLE_CAPABILITY_DEFAULTS.
Node role capability matrix. New admin_setting_roleperms
class renders a role × action matrix as a HTML table in plugin settings. Replaces the
hard-coded ROLE_CAPABILITIES constant with get_role_capabilities()
reading from config with fallback to defaults.
settings.php — New "Node role capability matrix" section.
Plugin promoted to MATURITY_BETA.
|
| v2.2.127 |
2026-03-27 |
Moodle Privacy API compliance. local_cohorttree_node_managers
and local_cohorttree_node_members tables added to
classes/privacy/provider.php metadata, export, and delete methods.
Audit-trail usermodified/createdby/addedby
fields anonymised on deletion; userid records deleted.
db/access.php — local/cohorttree:viewreports now
carries RISK_PERSONAL flag.
|
| v2.2.126 |
2026-03-27 |
virtual_cohorts.php — "Remove virtual cohort" button inline
onclick replaced with a delegated jQuery handler inside the AMD
require(["jquery"]) block. Inline handlers were blocked by Moodle 4.x
Content Security Policy, preventing the button from working.
|
Cohort Tree Manager v2.2.133 · Maincon AB · 2026 ·
Plugin component: local_cohorttree ·
Companion block: block_cohorttree v1.0.11